


Signature bottlenecks are where good deals go quiet. A contract sits in someone’s inbox, the CRM says “Contract Sent” for two weeks, and nobody’s sure whether the client even opened it. Getting a signed agreement out of Salesforce and back into the right record, without anyone re-keying data, is one of the highest-return integrations a revenue team can set up.
The catch: “integrate Docusign with Salesforce” isn’t one task. At one end you install a ready-made app from the Salesforce marketplace and configure it by pointing and clicking. At the other, a developer writes custom code against Docusign’s API to build a signing workflow from scratch. Pick the wrong end and you either overspend on capability you’ll never use, or hit a wall the day your process gets slightly non-standard.
Quick Answer: How to Integrate Docusign With Salesforce
Almost everyone integrates the same way: install one of Docusign’s official apps from the Salesforce marketplace as a managed package (a pre-built, vendor-maintained app that installs into your org without code), then connect it to your Docusign account and configure it declaratively.
Which app you install depends on what you need. eSignature sends documents for signature and writes results back; Gen generates the document from Salesforce data first; CLM manages whole contract lifecycles. All three install identically.
Two terms worth knowing before you go further. An envelope is Docusign’s unit for a single send. One envelope can hold several documents and several signers, and counts as one transaction whether it holds one page or twenty. It’s what Docusign tracks status against and meters your plan by, so “envelope volume” drives your real cost. Docusign Connectis the service that pushes envelope status back into Salesforce.
Not Comfortable in Salesforce Setup?
If you don’t have a developer on hand or the configuration stalls, ENWAY can install and configure the integration for you, then hand it over fully documented and tested.
What the Integration Actually Does
At its core, the integration generates a document from Salesforce data, sends it for signature, and writes the outcome back automatically. In practice:
- Send an Opportunity’s quote, an Account’s MSA, or a custom object’s form for signature without leaving Salesforce
- Pre-fill signer fields (name, email, contract values) from Salesforce records so nothing is typed twice
- Track envelope status (sent, delivered, completed, declined) on the record in real time
- Write signed dates, signer details, and the completed PDF back to the originating record
- Trigger downstream automation such as stage changes, task creation, and renewal scheduling the moment an envelope completes
First, Check Your Salesforce Edition
This is the gate. If your edition can’t install marketplace apps, most of this guide doesn’t apply to you, so it’s worth settling before reading further.
A naming note, because it trips people up: Salesforce retired the Essentials edition, and the current Sales Cloud lineup runs Starter Suite, Pro Suite, Enterprise, Unlimited, and Agentforce 1 Sales. Docusign’s documentation still refers to Professional, Enterprise, Unlimited, and Developer. That older naming maps to legacy orgs, so you’ll see both sets in circulation.
What matters is the capability behind the name. Docusign’s apps need managed-package installation and API access. That rules out Starter Suite, which has neither: no marketplace apps, no API, no custom objects. From Pro Suite / Professional upward you’re supported, with Enterprise and Unlimited giving the most headroom for anything beyond standard send-for-signature.
On Starter Suite? Your realistic options are running Docusign standalone and attaching signed files manually, or upgrading the edition, usually the cheaper answer if signatures are core to how you sell. Skip to Method 4 below.
Why Integrate Docusign With Salesforce
Beyond the mechanics, the integration changes how a revenue or operations team actually works day to day:
- Faster turnaround. Reusable templates and automated routing take agreements from a multi-day back-and-forth to a same-session signature, because the document is pre-filled and sent the moment a record hits the right stage.
- Fewer manual errors. Pre-populating signer and contract fields from Salesforce removes the re-keying that produces wrong names, stale pricing, and mismatched terms.
- Full visibility. Envelope status lives on the record, so anyone looking at the Opportunity can see whether a contract is sent, viewed, signed, or stalled. No chasing inboxes.
- Mobile signing. Signers complete agreements from any device, which matters most for the deals that would otherwise wait for someone to get back to a desk.
- Flexible routing. Define signer roles and route documents in serial, parallel, or mixed order, with automated reminders and deadlines, so multi-party agreements follow the correct approval path every time.
- A single audit trail. Every action, signer, and document version is recorded against the Salesforce record, which is what makes the workflow defensible when compliance or legal asks later.
Docusign Integration in the Real World
A global corporate-payments company needed agreements signed before purchases across multiple countries, each with different legal requirements. ENWAY embedded DocuSign into Salesforce order forms using country-specific templates and dynamic record data.
Choosing Your Product and Method
Two separate decisions sit behind every Docusign–Salesforce integration, and keeping them apart makes the rest straightforward.
Which Docusign product? eSignature for signing, Gen for generating documents, CLM for whole contract lifecycles. They stack rather than compete.
How does it connect? For almost everyone, a managed package from the marketplace. A custom REST API build, MuleSoft middleware, or no integration at all exist for specific constraints.
The distinction matters because all three products install through the same managed-package route. Choosing CLM over eSignature isn’t choosing a different integration method. It’s choosing a different tool that integrates identically.
Cost splits the same way: your edition decides whether a package can install, your product sets the licence price, and your method changes what you’re buying at all. Via the managed package you pay the marketplace price per product; via a custom build you pay for a Docusign plan with API access instead.
Which Docusign Product Do You Need?
These three are what you install via Method 1 below. All use the same managed-package route, so this choice is about capability and cost, not about how the integration works.
Which Docusign Product Do You Need?
All three install as managed packages. The difference is what they do and what they cost.
| Product | Best for | Editions | Clouds | From* |
|---|---|---|---|---|
|
Docusign eSignature for Salesforce
Start here
|
Standard send-for-signature from any object | Pro Suite / Professional and up | Sales, Revenue, Experience | From $30/user/mo |
| Docusign Gen for Salesforce | Generate the document from Salesforce data before sending | Pro Suite / Professional and up | Revenue, Government (requires Sales Cloud) | From $20/user/mo |
| Docusign CLM for Salesforce | Negotiation, clause libraries, obligation tracking at scale | Enterprise, Unlimited (best fit) | Sales, Service, Government (requires Sales Cloud) | From $45/user/mo |
*Prices apply to the managed-package route only. They are the per-user/month “starting at” figures from the Salesforce marketplace, billed annually, as of July 2026. A custom REST API build doesn’t buy these apps but needs a paid Docusign plan with API access; MuleSoft adds middleware licensing; standalone Docusign has no Salesforce app cost. “Starting at” is a floor; envelope volume, features, and seat count raise it. On Starter Suite none of these can install: no AppExchange apps and no API access. Verify current figures before quoting.
How Will You Connect It?
Four routes, and the first one covers almost everyone. Each is expanded in its own section below.
How Will You Connect It?
Almost everyone uses the managed package; the rest exist for specific constraints.
Method 1: Managed Package From the Marketplace
This is how almost every team integrates Docusign with Salesforce, and it’s the method Docusign builds for. You install an official app from the Salesforce marketplace, connect it to your Docusign account, and configure everything declaratively, with no code.
The choice within this method is which product to install. Docusign publishes three, and they stack rather than compete: eSignature is the foundation, Gen adds document creation on top, and CLM covers the full agreement lifecycle. All three install exactly the same way.
Docusign eSignature (Signing)
This is the default and the one most teams should start with. It’s the most downloaded e-signature app on the marketplace, and it does the core job end to end: send a document for signature from any Salesforce record, track its status on that record, and save the completed agreement back against it, all without leaving Salesforce.
Setup is declarative. You install it from the marketplace, authenticate against your Docusign account, map Salesforce fields to document fields, and add a “Send with Docusign” button to a page layout. No code required, and it works on standard and custom objects alike.
Its ceiling is the template model. If you need the document itself generated from Salesforce data, or redlined and negotiated before signing, you want Gen or CLM on top.
Docusign Gen (Document Generation)
Gen sits on top of eSignature and solves the step before signing: producing the document. It generates customized sales documents (quotes, order forms, agreements) directly from Salesforce record data, so a rep can create an agreement from Opportunity data in a few clicks rather than editing a Word file by hand.
Template building is click-not-code, and it works in both Lightning and Classic. It’s also the cheapest of the three native apps, though it requires Sales Cloud and is best understood as an add-on rather than a standalone answer, since you still need eSignature underneath it to actually collect signatures.
Gen builds the document; it doesn’t manage redlining or post-signature obligations. For that you’re into CLM.
Docusign CLM (Contract Lifecycle)
CLM is a different class of product. Where eSignature handles the signature and Gen handles document creation, CLM manages the whole agreement lifecycle: preparation, redlining, collaboration, approvals, and centralized storage with search. It’s aimed at organizations where contracts are negotiated rather than simply signed, and where what happens after signature (renewals, obligations, clause consistency) carries real risk.
It’s also the most expensive per seat and a genuine implementation project rather than an install. The most common mistake we see is buying CLM for what eSignature already does.
If your agreements aren’t actually negotiated, this is over-buying, and it’s the single most common mistake in this category.
Official vs Third-Party Apps on the Marketplace
Search “Docusign” on the Salesforce marketplace and you’ll get well over a thousand results, so it’s worth knowing which are which. The three apps above (eSignature, Gen, and CLM) are the official ones, published by Docusign, Inc. and supported directly by them.
Everything else is third-party: apps from other publishers (for example, eSign Connect by Appiphony) that wrap or extend Docusign. These can be cheaper or fit a specific niche, but you’re relying on that publisher, not Docusign, for support and updates. Vet maintenance history, review counts, and edition compatibility before committing.
As a rule, start with the official Docusign, Inc. listing unless a third-party app solves a specific problem the native one can’t.
Method 2: Custom Build on the eSignature REST API
The three methods that follow exist for genuine constraints: a workflow the package can’t express, a wider integration estate, or an edition that can’t install packages at all. Reach for them only when you can name the specific limitation pushing you there.
When your workflow genuinely doesn’t fit the managed package (unusual routing, very high volume, or a signing experience you need embedded in your own UI), you build against the eSignature REST API using Apex, Salesforce’s own programming language. Docusign publishes an Apex Toolkit that exposes ready-made objects and methods for Salesforce developers, so you’re not starting from raw HTTP calls.
The cost model differs from the marketplace products. Docusign’s free developer account lets you build and test in a sandbox, but it can’t send legally valid signatures. To go live you need a paid production Docusign plan with API access (Docusign calls these developer plans, priced on API features and the volume of envelopes sent through API calls), plus an integration key promoted to production. Budget for that plan and ongoing developer maintenance on top of the build.
The catch is maintenance: you own this build forever. Confirm the managed package genuinely can’t do the job before committing to that.
Method 3: MuleSoft Anypoint Platform
If Docusign is only one piece of a larger integration, connecting Salesforce, Docusign, and several other systems into a unified view, MuleSoft’s Anypoint Platform is the middleware route. It breaks down data silos across systems and pairs well with Salesforce Flow for automating processes with minimal code.
This is genuine enterprise middleware, though. It’s the right tool when signatures are one step in a broader multi-system data flow, and considerable overkill if all you need is contracts signed from Salesforce.
Don’t buy middleware to solve a signature problem.
Method 4: Standalone Docusign (No Integration)
Not an integration in the real sense, but the honest fallback if your Salesforce edition can’t install marketplace apps. You run Docusign in its own web app (or via its Gmail, Outlook, or Word integrations), send agreements from there, and attach the signed PDF back to the Salesforce record by hand.
Everything the integration automates (pre-filled fields, live status on the record, automatic write-back, triggered follow-up) you do manually. That’s tolerable at a handful of agreements a month and unworkable beyond it.
It stops working as soon as volume grows, at which point upgrading the Salesforce edition is usually cheaper than the manual labour.
Step-by-Step: Installing the Managed Package
Before you begin, make sure you have a Salesforce org and permission to install a managed package in that org. Disable your browser’s pop-up blocker too — the Docusign login opens in a pop-up and will silently fail without it. Explore the official DocuSign documentation for detailed instructions.
This walkthrough starts from the Docusign eSignature for Salesforce listing, but the install is identical from any of them: all the listings deliver the same Docusign Apps Launcher package. Don’t be alarmed if the install screen names a different product than the one you clicked.
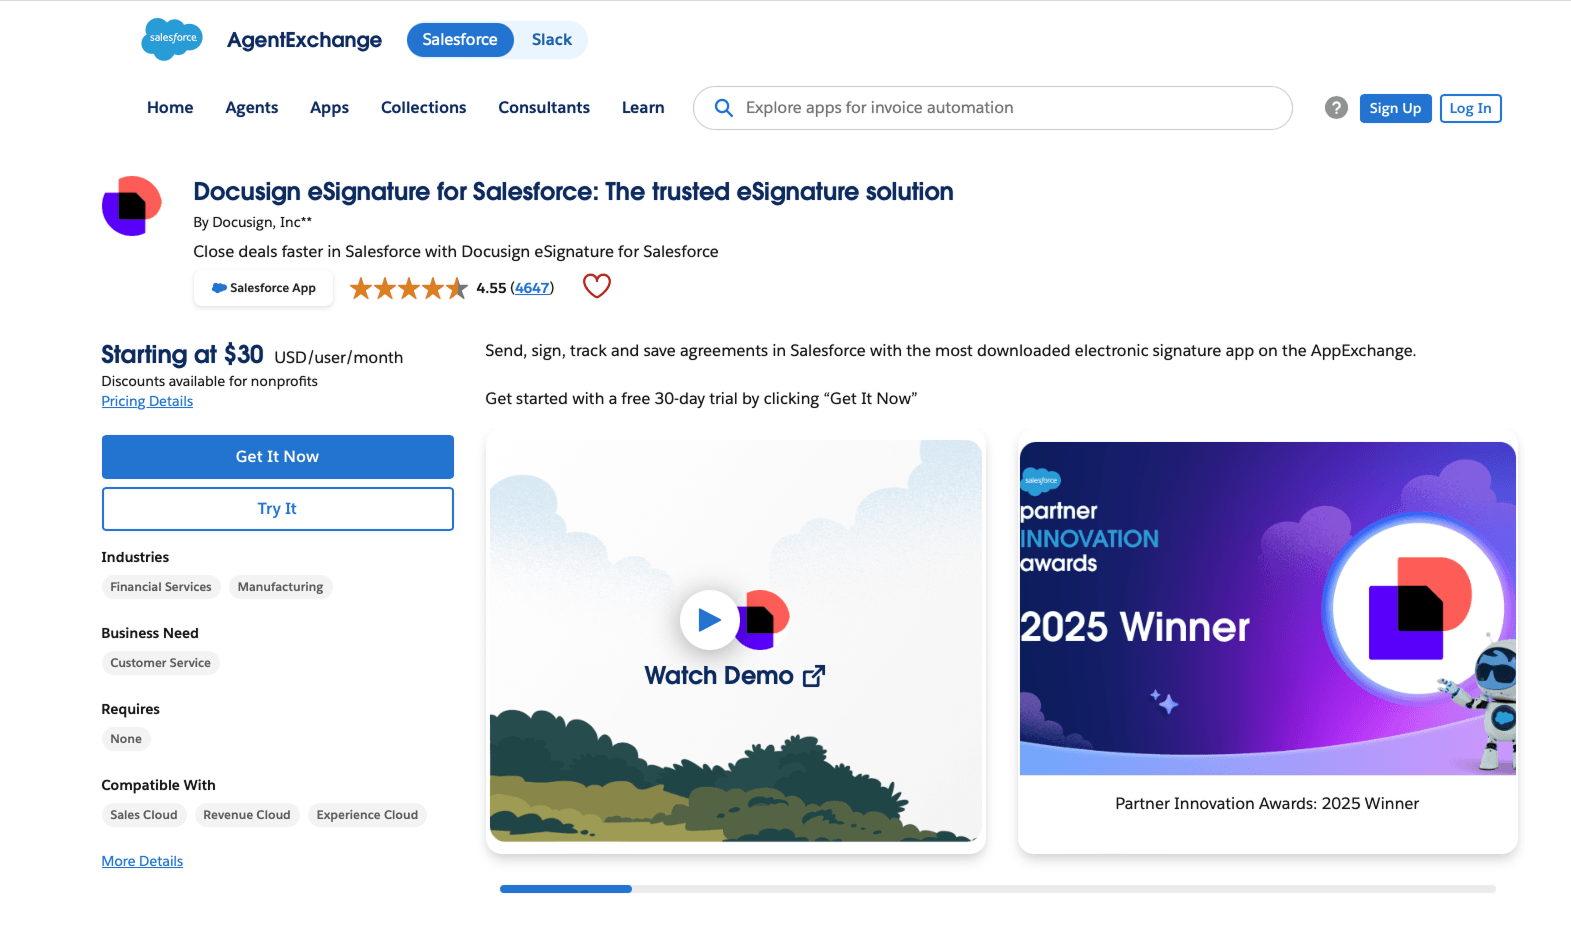
Step 1 — Find the app on the marketplace. Search the Salesforce marketplace for Docusign eSignature for Salesforce, published by Docusign, Inc. Click Get It Now to install, or Try It to spin up a trial environment first.
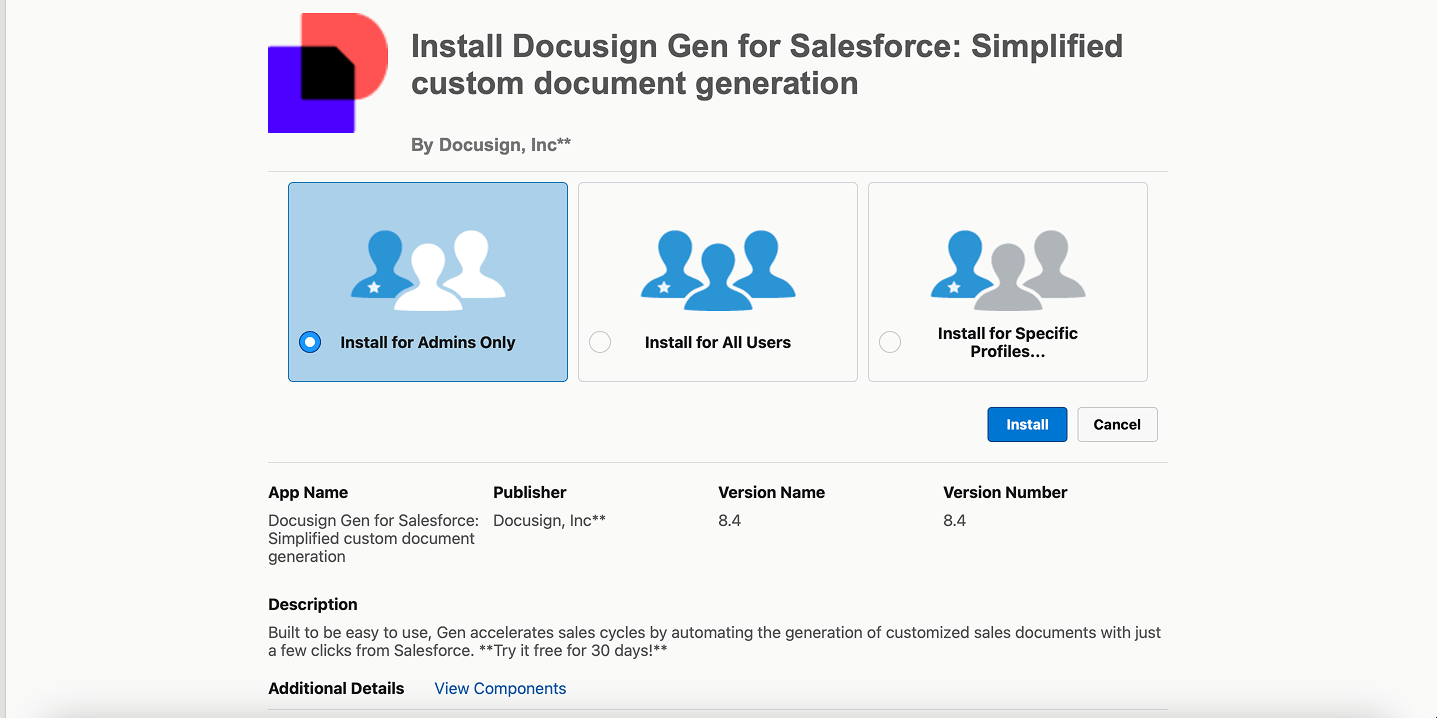
Step 2 — Choose who to install for. Salesforce asks who should get access: Install for Admins Only, Install for All Users, or Install for Specific Profiles. Admins Only is the safe default — you can widen access later once the integration is configured and tested. Install into a sandbox first; you control that by running the install against a sandbox org rather than production, not by any setting in this dialog.
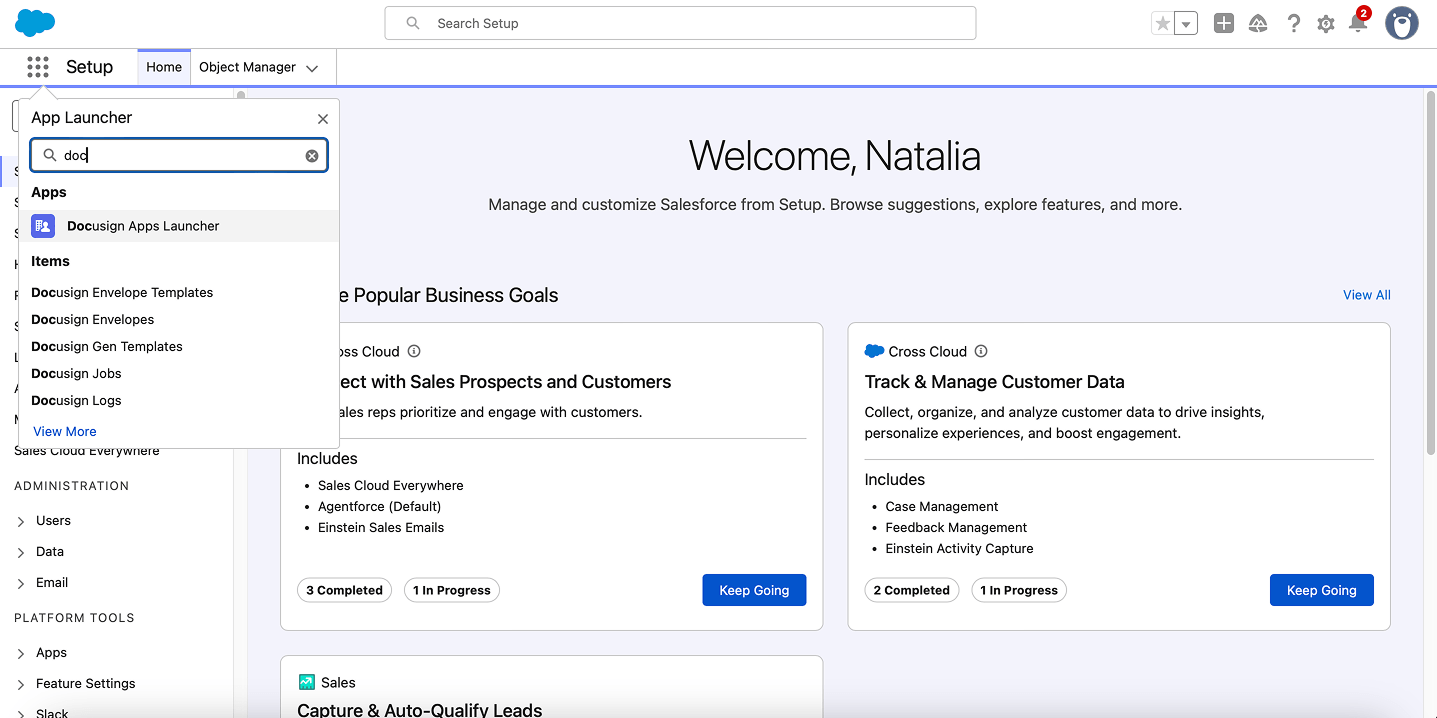
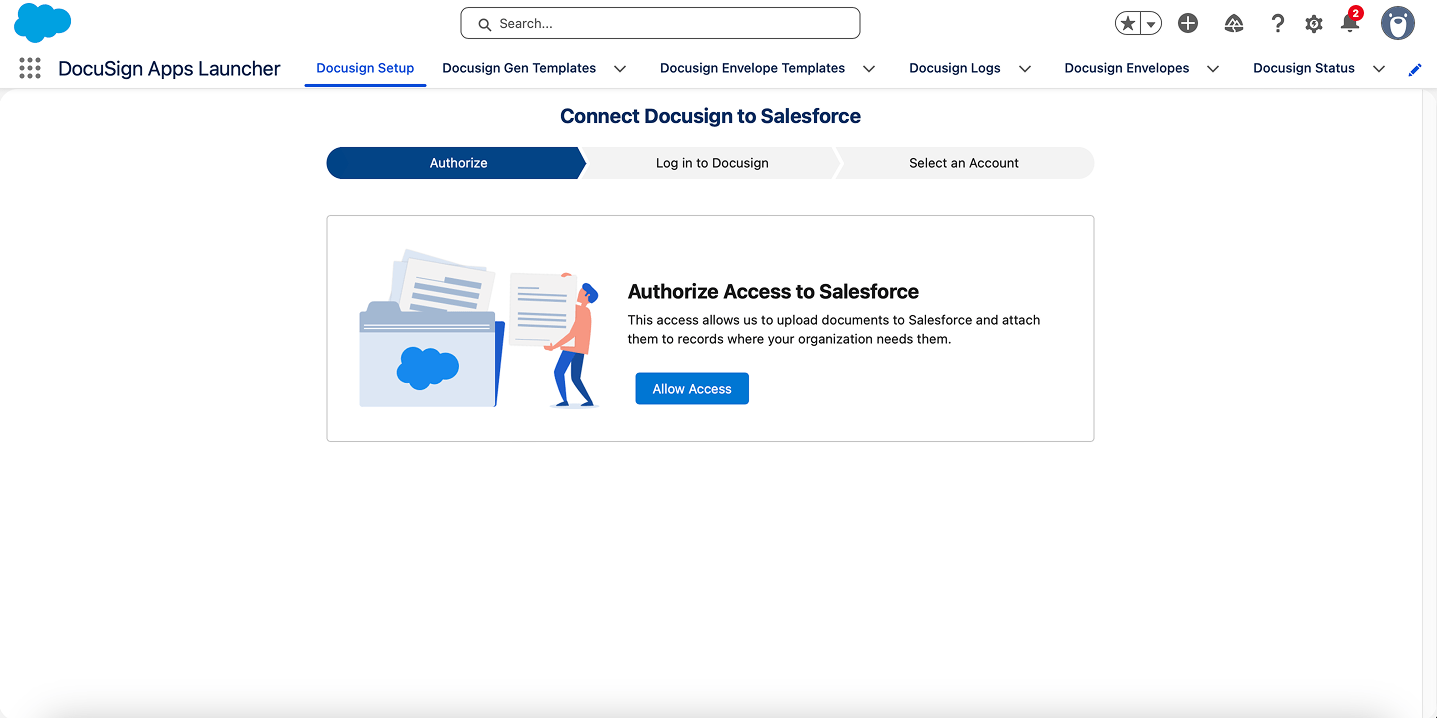
Step 3 — Open Docusign Apps Launcher. Once installation finishes, open the App Launcher, type “doc”, and select Docusign Apps Launcher. You’ll also see the objects the package added — Docusign Envelopes, Envelope Templates, Gen Templates, Jobs, and Logs. The launcher opens on the Docusign Setup tab, which runs a three-step connection wizard: Authorize → Log in to Docusign → Select an Account.
Step 4 — Authorize access to Salesforce. The first wizard step asks you to grant Docusign permission to upload documents into Salesforce and attach them to records. Click Allow Access and confirm the standard Salesforce OAuth prompt.
Step 5 — Log in to your Docusign account. Click Log in to Docusign and authenticate in the pop-up. This connects your production Docusign account by default, which is what you want for a live rollout.
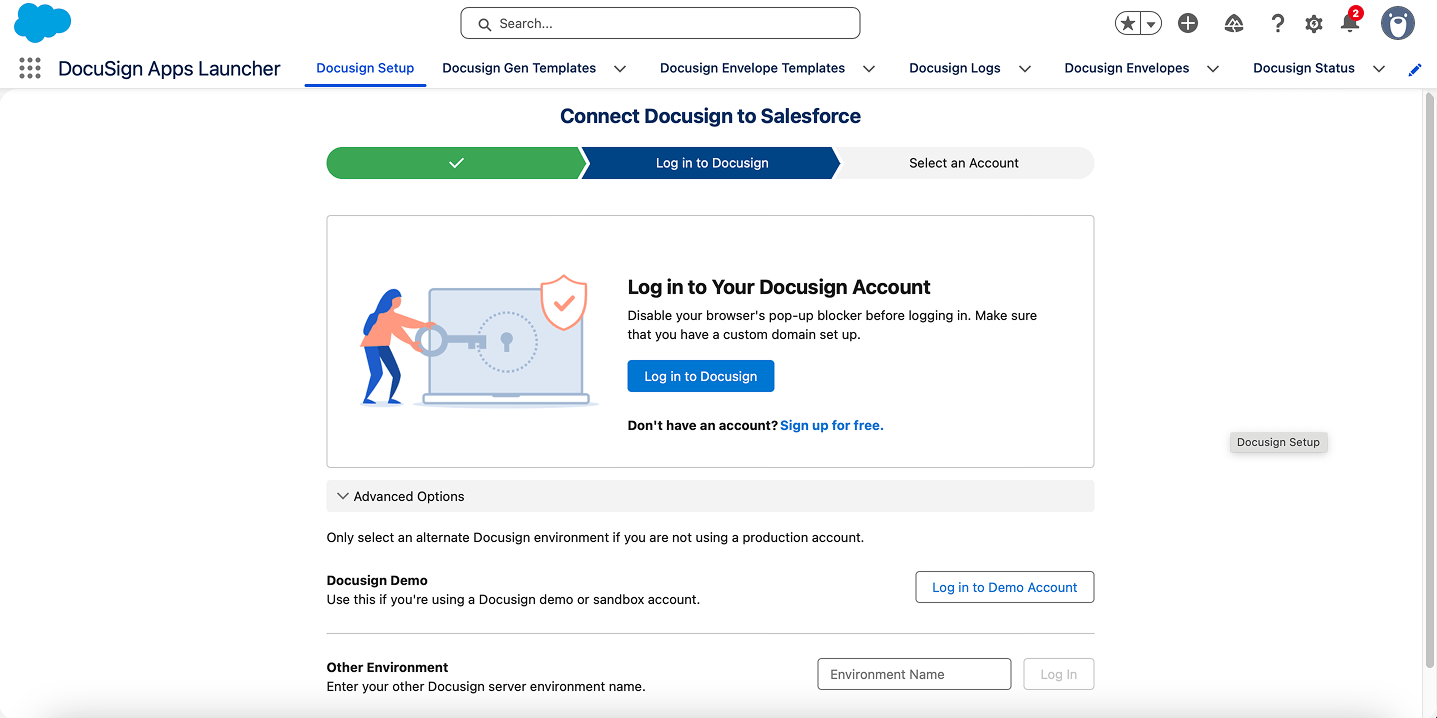
If you’re working with a demo or sandbox Docusign account, don’t use the main button. Expand Advanced Options and choose Log in to Demo Account instead (or enter a named server under Other Environment). Mixing these up is the single most common cause of an integration that works in testing and breaks in production, so be deliberate here.
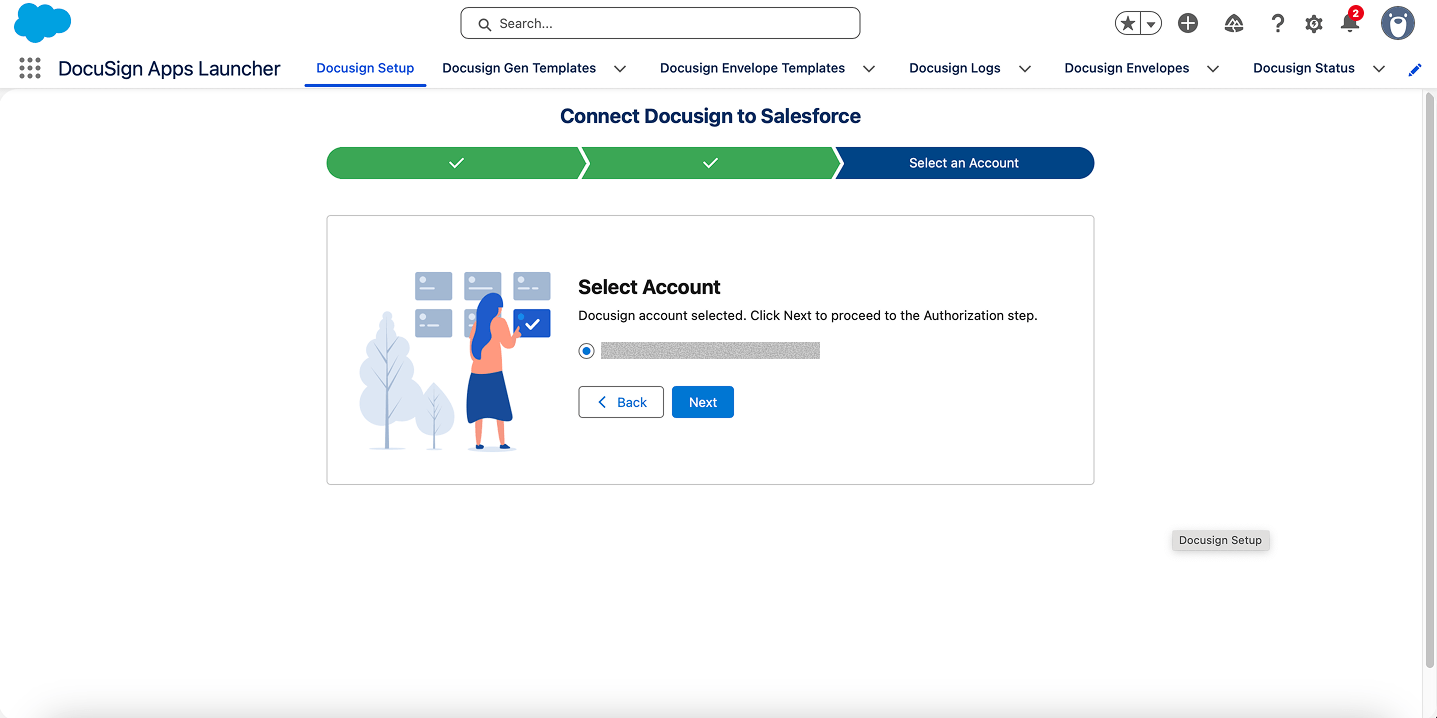
Step 6 — Select an account. If your Docusign login has access to more than one account, pick the one to connect and click Next. The wizard confirms your selection before finishing.
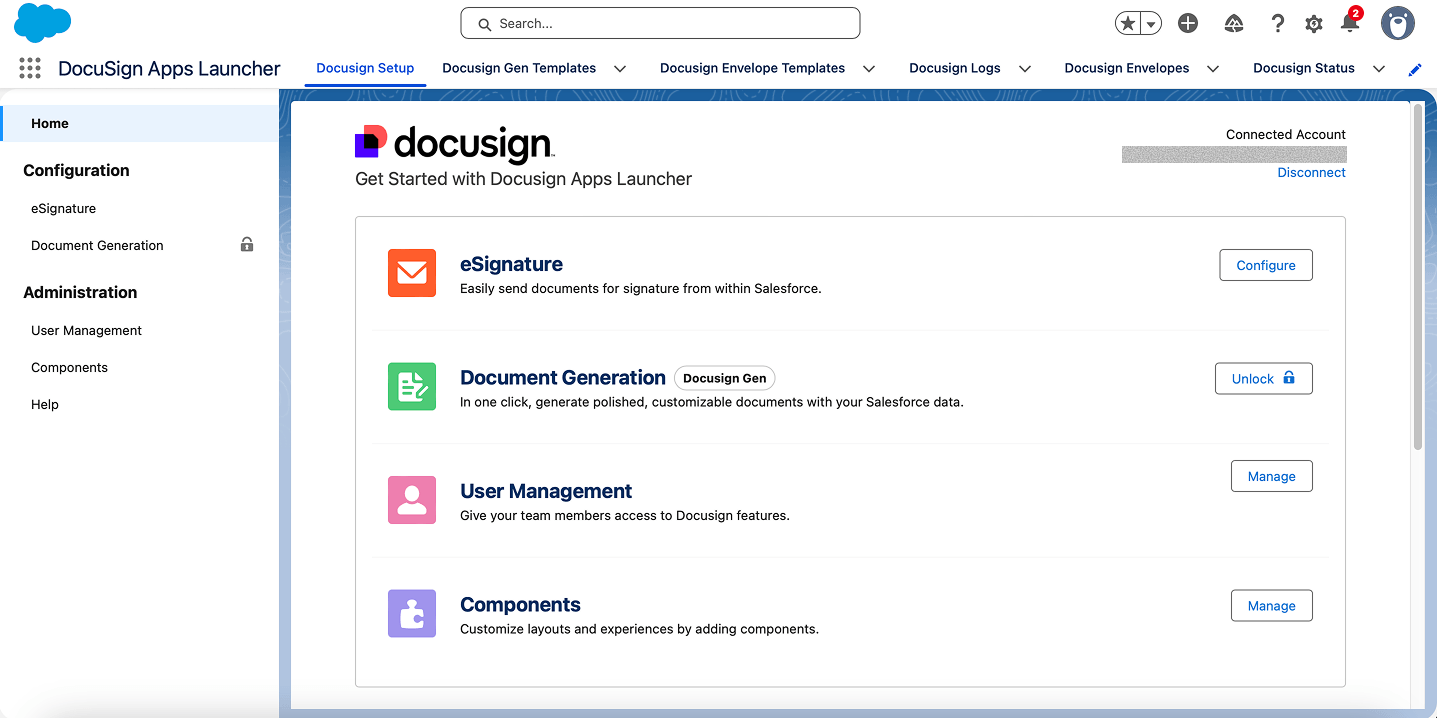
Step 7 — Configure the products you’ve licensed. You’ll land on the Docusign Setup home, showing your connected account and a card per product. Click Configure next to eSignature to set it up. If you’ve bought Gen, Document Generation appears with an Unlock button — it stays locked until licensed. The same screen has User Managementfor giving team members access to Docusign features, and Components for adding Docusign elements to your page layouts.
Step 8 — Map fields, enable write-back, and test. With the products configured, set up your field mappings, enable Docusign Connect for status write-back, build your send templates, and add a “Send with Docusign” action to the relevant layouts. Then send a real envelope from a sandbox record, sign it, and confirm both the status and the signed PDF write back to the correct record before promoting anything to production.
Configuring the Integration
Installing the package is the easy part. What data moves, and what happens automatically, is where a working integration is actually built.
Mapping Salesforce Data to Docusign
The value of the integration lives in the mapping, which runs in two directions:
- Outbound (Salesforce → Docusign): map record fields to the signature, date, and text fields on the document (Docusign calls these “tabs”) and to recipient details — Account name, signer contact email, contract value, effective dates. Merge fields populate the template body from Salesforce data.
- Inbound (Docusign → Salesforce): map the envelope outcome back via Docusign Connect: envelope status, completed date, signer name and email, and the signed document stored as a Salesforce File or attachment.
Document your field mapping separately from the config. When someone renames a Salesforce field or adds a signer role, an undocumented mapping is the first thing to silently break, and the last thing anyone thinks to check.
Planning a Docusign Integration?
From managed packages to custom builds, we’ll help you choose the right connection option, map your fields, and get envelopes signing from Salesforce, without sandbox-to-production surprises.
Automating With Salesforce Flow
Manual “click to send” works, but the integration pays off most when sending and follow-up are automated:
- Auto-send on stage change. A record-triggered Flow fires a Docusign send when an Opportunity reaches “Contract Sent.”
- Post-completion automation. When Connect writes back a “Completed” status, a Flow advances the stage, creates an onboarding task, and schedules the renewal date.
- Reminder cadence. Docusign’s own reminder and expiration settings handle nudges better than rebuilding them in Flow; configure them in the template.
A Record-Triggered Signing Flow
Let Docusign Connect be the source of truth for status, and have Flow react to it.
Order of operations matters: let Docusign Connect be the source of truth for envelope status and have Flow react to it. Don’t poll Docusign from Salesforce on a schedule; it’s fragile and burns API limits.
Common Pitfalls
- Sandbox vs production environment mismatch. The most frequent failure by far: authenticating a Salesforce sandbox against a production Docusign account, or vice versa. Verify the environment after every deployment.
- API and Connect limits. High send volumes hit Docusign envelope allowances and Salesforce API limits. Confirm both before assuming the managed package scales.
- Field mapping drift. Renamed or reworked Salesforce fields silently break mappings. Version-control the mapping documentation.
- Over-reaching with CLM. Teams buy CLM for what the eSignature package already does. Match the tool to the complexity you actually have, not the complexity you imagine.
- Signed document storage. Decide early whether the completed PDF lives as a Salesforce File, an attachment, or in Docusign only. Retrieving it later is painful if storage wasn’t planned.
- Permission and licensing gaps. Users need both the right Salesforce profile access and a Docusign membership. Someone who can click “Send” but has no Docusign seat produces a confusing failure.
Frequently Asked Questions
How much does Docusign for Salesforce cost? It depends which connection method you use. Via the managed package, the usual route, the marketplace lists per-user starting prices per product: eSignature from $30/user/month, Gen from $20, and CLM from $45 (billed annually, as of July 2026), with no separate Salesforce licence fee for the package itself. A custom REST API build doesn’t buy those apps; it needs a paid Docusign plan with API access instead. In both cases the published figures are floors that envelope volume and advanced features raise, so check the current listing and Docusign’s pricing page for a firm number.
Can Docusign write the signed document back to Salesforce automatically? Yes. Docusign Connect pushes envelope status and the completed document back to the originating record when configured. You choose whether the signed PDF is stored as a Salesforce File or an attachment.
Does the integration work with custom objects? Yes. The managed package can send from custom objects, not just Opportunities and Contracts, provided you configure the send template and field mapping for that object.
What’s the difference between Docusign eSignature and Docusign CLM in Salesforce? eSignature handles sending documents for signature and writing results back. CLM adds document generation, negotiation, clause libraries, and obligation tracking for complex agreement processes, at substantially higher cost and configuration effort.
Can I automate sending with Salesforce Flow? Yes. Record-triggered Flows can send envelopes on stage changes, and Flows can react to Docusign Connect status write-backs to advance stages, create tasks, or schedule renewals.
Why does my integration work in sandbox but fail in production? Almost always an environment mismatch: the OAuth connection or Connect configuration is still pointed at the demo environment (account-d.docusign.com) instead of production (account.docusign.com). Verify the connection after every deployment.
