During the autotest execution in Salesforce, there are two main ways to get Salesforce data — UI and CLI. In this article, I’ll cover these methods and their optimal usage.
So, you need to access an existing Salesforce object during autotests. Your actions?
Salesforce Object Access via UI
First of all, you can get Salesforce object fields using UI selectors. It means that you need to navigate to the object you need, find object fields by various locators, and get field values.
Use this approach if you need to:
- Check how fields are located on the layout
- Check the labels’ translations on the layout
- Check field access (read or edit)
- Imitate real user behaviour while navigating Salesforce
Let’s move on to the hands-on example. For example, we need to check the value of the field Lead Status. For test purposes, I’ve already created a Lead object, and its ID is known. I personally use the WebdriverIO framework.
To speed up the process of opening this object, we will pass the ID to the browser URL. Please note that during real tests, you may need to find this object via Salesforce UI. That’s why the test may last longer.
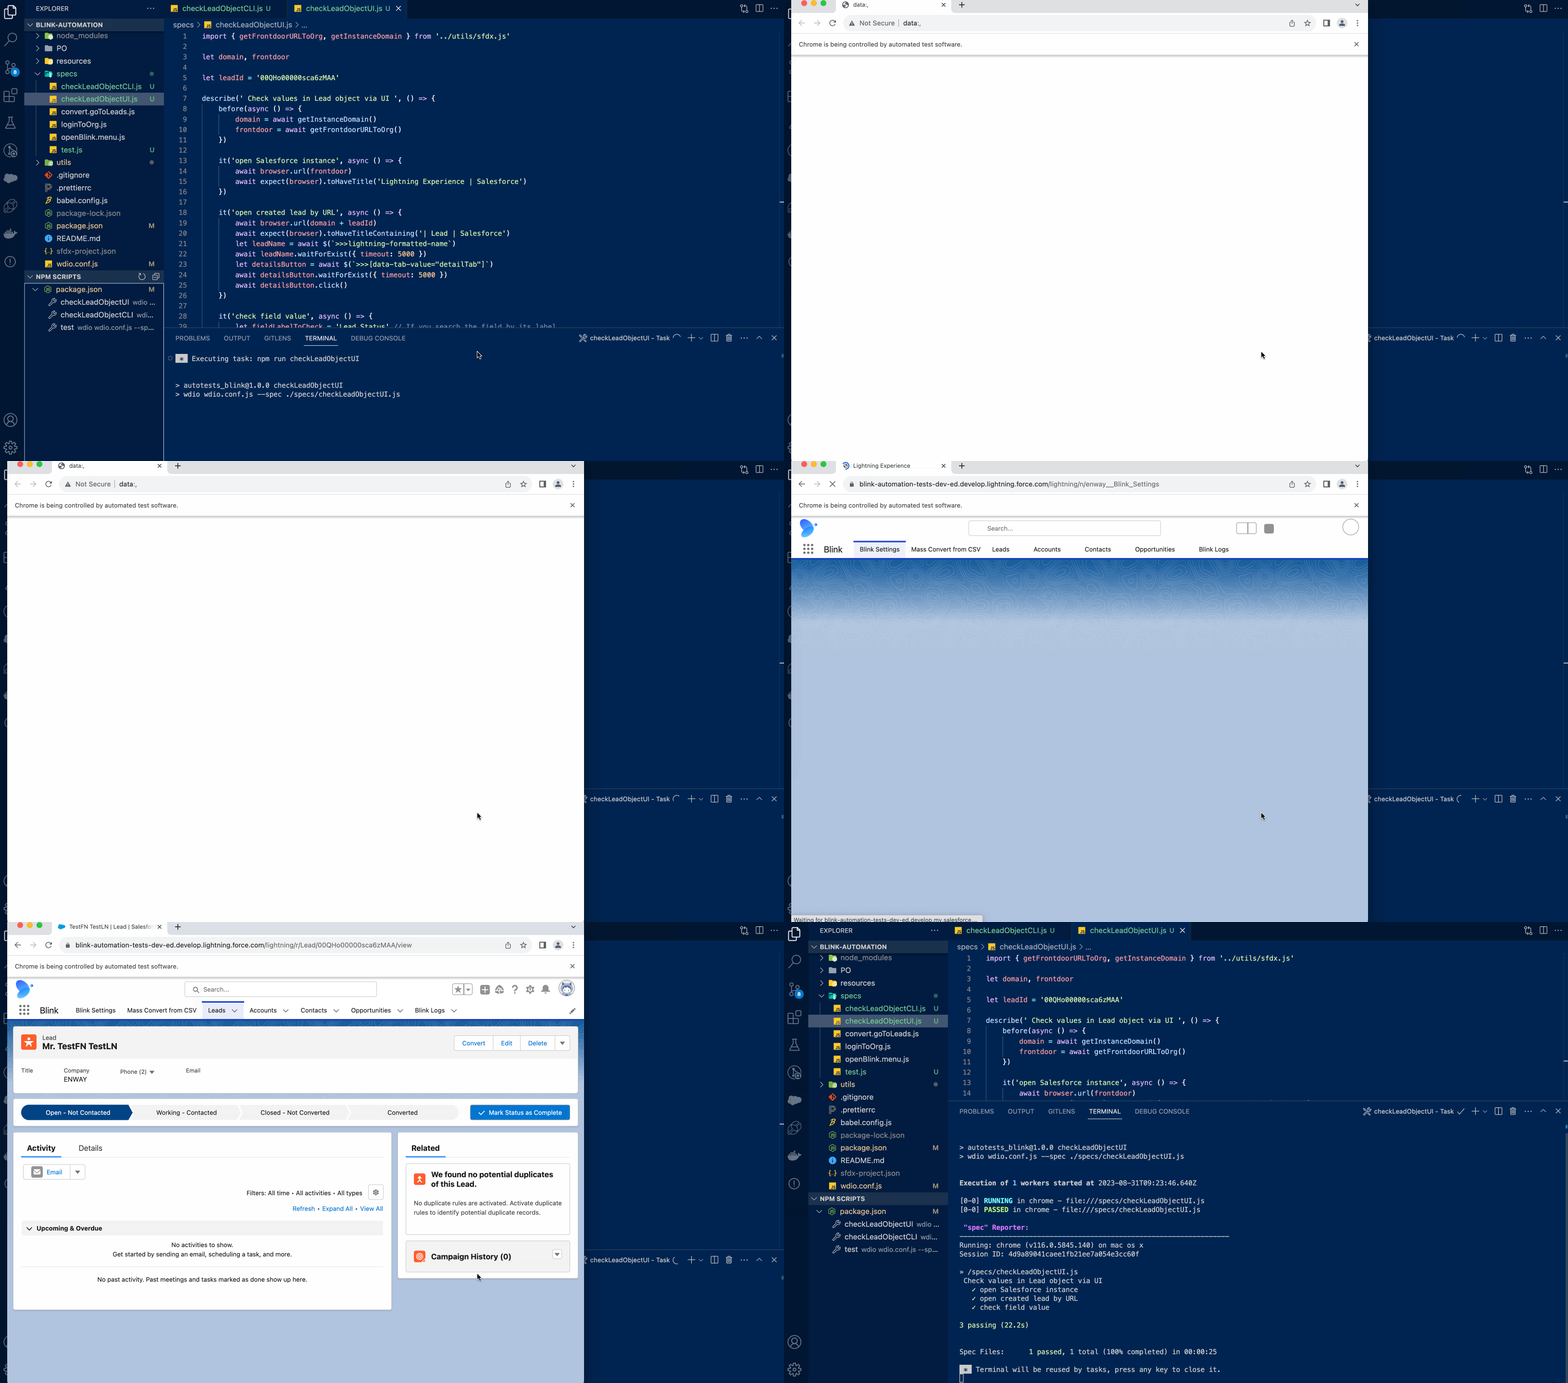
Full test for UI checks will be look like this:
import { getFrontdoorURLToOrg, getInstanceDomain } from '../utils/sfdx.js'

let domain, frontdoor
let leadId = '00QHo00000sca6zMAA'

describe(' Check values in Lead object via UI ', () => {
    before(async () => {
        domain = await getInstanceDomain()
        frontdoor = await getFrontdoorURLToOrg()
    })

    it('open Salesforce instance', async () => {
        await browser.url(frontdoor)
        await expect(browser).toHaveTitle('Lightning Experience | Salesforce')
    })

    it('open created lead by URL', async () => {
        await browser.url(domain + leadId)
        await expect(browser).toHaveTitleContaining('| Lead | Salesforce')
        let leadName = await $(`>>>lightning-formatted-name`)
        await leadName.waitForExist({ timeout: 5000 })
        let detailsButton = await $(`>>>[data-tab-value="detailTab"]`)
        await detailsButton.waitForExist({ timeout: 5000 })
        await detailsButton.click()
    })

    it('check field value', async () => {
        let fieldLabelToCheck = 'Lead Status' // If you search the field by its label
        let fieldToCheck = await $(`>>>records-record-layout-item[field-label="${fieldLabelToCheck}"] .slds-form-element__control span`) // If you search the field by its label
        // let fieldAPINameToCheck = 'Status' // If you search the field by its API name
        // let fieldToCheck = await $(`>>>[data-target-selection-name$="${fieldAPINameToCheck}"] .slds-form-element__control span`) // If you search the field by its API name
        await fieldToCheck.waitForExist({ timeout: 5000 })
        let fieldToCheckValue = await fieldToCheck.getText()
        expect(fieldToCheckValue).toBe('Open - Not Contacted')
    })
})
The test execution:

Salesforce Object Access via Salesforce CLI
The second option is to get the Salesforce object with the Salesforce CLI tool. Salesforce Command Line Interface (CLI) is a free, open-source tool that streamlines the process of development and simplifies build automation.
Use this approach if you need to:
- Check the object field value
- Check that some values are saved correctly according to business processes
To write the test, use simple CLI commands to get the whole object in JSON format and use it in the way key:value, where key is the API name of the field and value is its value.
This is how the lead object will look like:
{
  attributes:
    {
      type: "Lead",
      url: "/services/data/v58.0/sobjects/Lead/00QHo00000sca6zMAA",
    },
  Id: "00QHo00000sca6zMAA",
  IsDeleted: false,
  MasterRecordId: null,
  LastName: "TestLN",
  FirstName: "TestFN",
  Salutation: "Mr.",
  Name: "TestFN TestLN",
  Title: null,
  Company: "ENWAY",
  Street: null,
  City: null,
  State: null,
  PostalCode: null,
  Country: null,
  Latitude: null,
  Longitude: null,
  GeocodeAccuracy: null,
  Address: null,
  Phone: null,
  MobilePhone: null,
  Fax: null,
  Email: null,
  Website: null,
  PhotoUrl: null,
  Description: null,
  LeadSource: null,
  Status: "Open - Not Contacted",
  Industry: null,
  …,
}
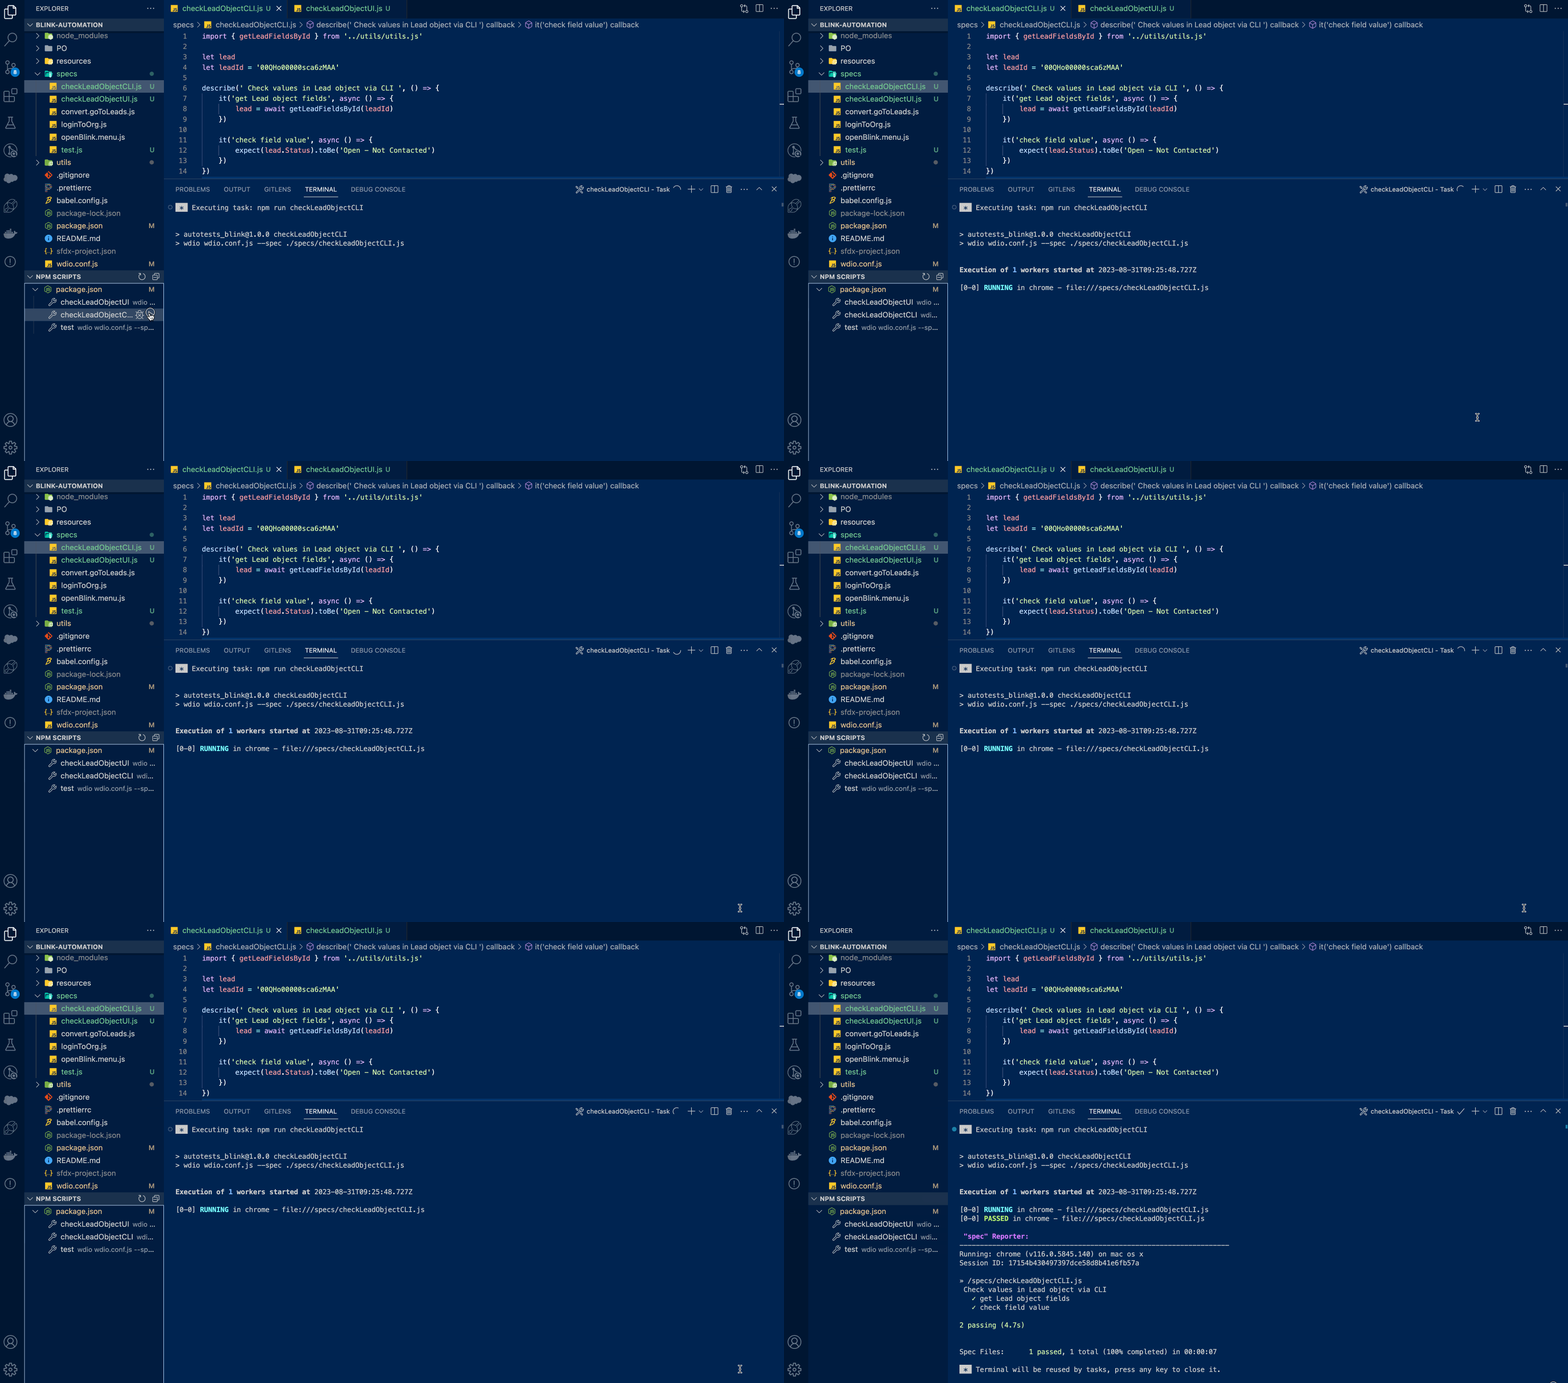
Full test for CLI checks will be look like this:
import { getLeadFieldsById } from '../utils/utils.js'

let lead
let leadId = '00QHo00000sca6zMAA'

describe(' Check values in Lead object via CLI ', () => {
    it('get Lead object fields', async () => {
        lead = await getLeadFieldsById(leadId)
    })

    it('check field value', async () => {
        expect(lead.Status).toBe('Open - Not Contacted')
    })
})
The test execution:

In these tests, you can see some utils methods imported from utils.js and sfdx.js files. You can find them below:
import exec from 'executive'
import fs from 'fs'

/**
 * This function takes a leadId as an argument and returns the lead object or an error
 * @param leadId - The ID of the lead you want to get the fields for.
 * @returns The lead object or an error
 */
export async function getLeadFieldsById(leadId) {
    let lead = await getRecord('Lead', leadId)
    if (lead.status == 1) {
        return lead.name
    } else {
        return lead.result
    }
}

/**
 * This function will return the record of the specified SObject type and ID
 * @param SOBJECTTYPE - The API name of the object you want to get.
 * @param SOBJECTID - The ID of the record you want to retrieve.
 * @returns The record data
 */
export async function getRecord(SOBJECTTYPE, SOBJECTID) {
    await auth()
    let resp = await exec.quiet(`sf data get record -s ${SOBJECTTYPE} -i ${SOBJECTID} --json`)
    return await clearLogs(resp.stdout)
}

/**
 * It writes the auth file to the apex directory and then stores the auth file in the sfdx auth store.
 * @returns The auth function is returning the result of the exec.quiet function.
 */
export async function auth() {
    if (process.env.auth) {
        let file = { sfdxAuthUrl: process.env.auth }
        fs.writeFileSync(`./apex/authFile.json`, JSON.stringify(file))
    }
    return await exec.quiet(`sf org login sfdx-url --sfdx-url-file ./apex/authFile.json`)
}

/**
 * It retrieves the domain of the current Salesforce instance.
 * @returns the domain of the Salesforce instance.
 */
export async function getInstanceDomain() {
    await auth()
    let resp = await exec.quiet(`sf org display --json`)
    resp = await clearLogs(resp.stdout)
    let domain = resp.result.instanceUrl + '/'
    return domain
}

/**
 * It generates the frontdoor URL to the organization after authenticating.
 * @returns The URL of the frontdoor for the organization.
 */
export async function getFrontdoorURLToOrg() {
    await auth()
    let resp = await exec.quiet(`sf org open -r --json`)
    resp = await clearLogs(resp.stdout)
    let url = resp.result.url
    return url
}

/**
 * It removes all the color codes from the string
 * @param str - The string to be parsed
 * @returns The result is a JSON object.
 */
export async function clearLogs(str) {
    let result = str
        .replace(/\x1B\[97m/g, '')
        .replace(/\x1B\[94m/g, '')
        .replace(/\x1B\[93m/g, '')
        .replace(/\x1B\[92m/g, '')
        .replace(/\x1B\[91m/g, '')
        .replace(/\x1B\[90m/g, '')
        .replace(/\x1B\[39m/g, '')
        .replace(/\x1B\[34m/g, '')
        .replace(/\x1B\[32m/g, '')
    return JSON.parse(result)
}
What Approach Is Better for Your Project?
Using the Salesforce CLI tool speeds up your test execution because you don’t need to wait until the test reaches the values via UI search. However, using the UI approach brings closer interaction with real users. Additionally, via UI approach, you can cover Salesforce apps with automated tests. So, you can combine both methods based on your project.
Conclusion
I hope now two techniques for checking the values of object fields in Salesforce become clearer for you. In the next article, I’ll walk you through how to create Salesforce objects during automated tests. Stay tuned!


